Pages

Monday, October 8, 2012

Dream Big!


Hi friends! Here's a fun little card that could be used for almost any occasion.
 

To make the cute banner pieces, I first added the washi tape to strips of white cardstock, then notched the ends before adding behind the dream big sticker. I like how the washi gives it a bit of dimension ;)
 
Thanks so much for stopping by Love My Tapes, we love to inspire!


Thursday, October 4, 2012

Flag!!...You're It!

I love combining my Washi Tape collection with fun trends!  You can't go wrong with two great trends together!!  One of my favorites, being Flags!  They are so cute and easy to make and add to your pages.


I can't say how easy these were to make, but they are such a fun embellishment for your pages!  Grab a toothpick, cut off about a 3 inch strip of Washi Tape, then fold it over itself and the toothpick.  Once you have it adhered, you can cut a triangle out of the end or leave it straight.  Stick pins would also work for your Flags and you could use some of Love My Tapes Fabric Tape also, for Flag embellishments.  Once your Flag is attached to your page, you can "dress" it up, by adding a die cut, brad, button, pearl, title or whatever you would like to the center.  And tying two or more together with baker's twine, adds another fun element to your page!

Have fun on your next layout, creating your own hand-made Flag embellishments and gettin' crafty with your Washi Tape!


Wednesday, October 3, 2012

Inspired by Pinterest

Hello Love My Tapes fans!

Kathy Martin here with a question for you...how many of you are hopelessly addicted to Pinterest? I'm raising my hand and jumping up from my chair! :) I love Pinterest! I love the recipes, the beautiful photos and the crafty inspiration! I could go on and on!

One of my pin boards is dedicated to my love of washi tape and I recently pinned the following project.


Washi tape wrapped tea lights?!?! Now, why didn't I think of that?


What I did think of was, "How would the Love My Tapes fabric tape look on tea lights?"


As luck would have it, I had some tea lights and these little glass holders!


Isn't it fun when a project inspires you enough to get up off you behind and make it right then and there? This was one of those projects and I thought I'd share it with you.

If you would like to see many more clever ways to use tape visit my pin board here.

Thanks for stopping by!


Monday, October 1, 2012

Hoot Hoot!

 
Hello bloggers Rita Barakat here!
Can you believe it's October already?
To kick off the month I have this fun seasonal card
with a little polka dots washi tape!
 
Image of washi tape #601
So what are you going to create?


Friday, September 28, 2012

Can You Spot the Washi??

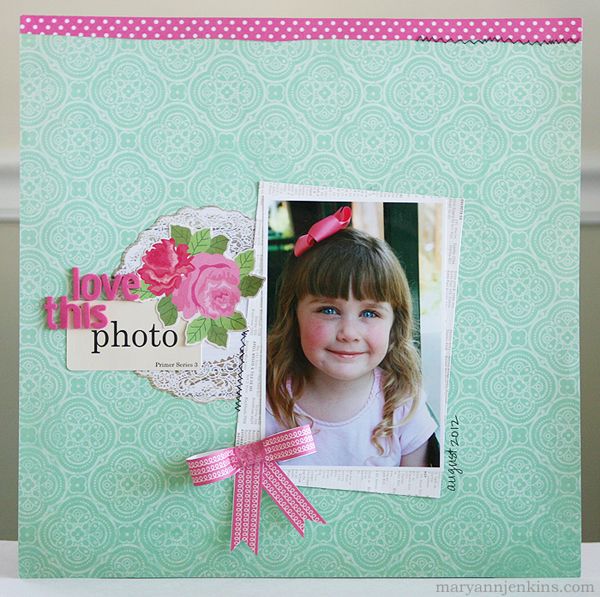
I know it looks like this layout is made up of patterned papers and stickers, but did you know there's washi on there too??
 
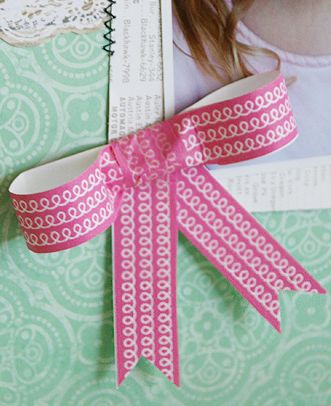
Although the cute bow looks like it's made of paper, it and the pink polka dot strip at the top are both made from washi tape! 
 
For the bow, I adhered a 12" long piece of washi tape to a small strip of white cardstock, this way the cardstock would help the washi keep it's 3-d dimension once it was cut and made into a bow. A few pieces of foam tape inside the loops of the bow will keep them from being flattened once the layout is in an album.
 
It's fun to see all the creative ways washi can be used!


Wednesday, September 26, 2012

Lace in Bloom

One of my favorite things about Love My Tapes, has to be the variety of tapes they offer...Washi, Fabric, and beautiful Lace tapes.  I have been so excited to work with the Lace Roll Tapes, since I joined the Team and knew I had to use them on a very girly layout.  What's more girly than Ballet??!!  So, I went to work on some Lace flowers to go with the photos from my daughter's first day back to Ballet class this year.


These were SO EASY to make!!  I had some Glubers in my stash, so I took out two different sizes.  Then I unrolled the Lace tape and removed the backing as I went, adhering it to the Gluber.  Start on the outside edge of the Gluber and work your way toward the center.  To help the flower shape "lay" down a little better, I added in a pleat about every half inch.  It really helped to give the flower more dimension.  If you don't have any Glubers, you can get the same effect, by punching a circle or cutting one on your die cut machine.  The Lace tape has it's own adhesive, so you could easily attach it to your circle.  Once you are finished forming your flower, you can finish off the center with buttons or brads.

Thanks for stopping by today and I hope to see some Lace flowers blooming on your next layout!!  :)

Ashley


Monday, September 24, 2012

September Challenge Winner!

Hello Love My Tapes Friends!  Sorry for the delay in announcing the winner, but without further adieu....

The winner of the September Challenge is....


Please email me (Tina), at adogslife13@hotmail.com with your shipping details. 

Thank you so much for playing along and stay tuned for the next challenge in October!