Pages

Monday, October 6, 2014

Halloween Mini Banner

Hey everyone, Katie here! Today I wanted to share with you guys the mini banner I created for Halloween using some of my tapes!


I made the circles by just layering black and white washi tapes on to paper and then die cutting the circles in my Brother ScanNCut machine, pretty simple.

For the candy corn, I didn't have any orange tapes! Oh no! So, I grabbed some of my white lace tapes and some orange gelatos. I rubbed the gelatos around on the tape and then misted them with water to "dye" the white lace tape.
I saw Tessa (fellow LMT designer!) do this technique and have loved it ever since!


To make the candy corn, I layered the tapes on a piece of paper, then drew rounded triangles onto the back of the paper with a pencil and cut them out.


To put my banner together, I just ran my circles and candy corn through the sewing machine, spacing them evenly.


This is such an easy way to make some decor for your home, just in time for Autumn! :)

Friday, October 3, 2014

Pretty packages

Hi LMT friends, it's Jaclyn here today.  In my family we have a number of birthdays during the month of October.  I have already purchased several gift cards, but I wanted a way to present them to my recipients other than just tucked inside a card.  Pillow boxes and washi tape came to the rescue!  These simple supplies made for quick and pretty packaging to house my gifts.

I started by laying three side by side strips of the chosen tape next to each other, around the width of the pillow box. I then layered two strips of lace tape around the middle for some added texture.  The rest is finished off in no time, with a quick wrap of coordinating twine and a gift tag that is tied on and secured!


This floral tape has always been one of my favorites.  I love how the lighter colors pop against the black background.  The black lace tape and twine add a nice bit of texture and compliment the pattern well.


The fabric tapes work well for this project too!  Here I've used the pink and white stripe fabric tape, as my base, layering on the lace tape and twine again.


With the holidays quickly approaching, I know we're all searching for quick and pretty ways to fancy up our gift giving.  What's great about this project is that it can easily be customized to the holiday or occasion, based upon the tapes you choose.  I hope you'll give it a try!

Thursday, October 2, 2014

Washi Tape Layout Border

Hello! Tessa here with a quick technique tip for your next layout. I love to add strips of pattern and color to the edges of my layouts. Washi tape makes doing so easy and quick:


I wanted to add just a bit of a coordinating color, but nothing so solid that it made the page feel heavy. This green dot washi tape from Love My Tapes was the perfect solution. The translucent white background and two-toned dots made for a great border.


Bonus tip: Do you ever spray your cardstock with a little mist, only to have your cardstock bubble or warp? Use your washi tape to frame out your page, but stick the washi tape slightly off the edge of your layout to temporarily adhere the page to your work surface. Spray lightly, then allow to dry. Because the page is secured flat to your work surface, the cardstock stays smooth as it dries.


You could fold over the excess washi tape, but I suggest trimming with scissors for a clean edge that you're sure won't peel away.


I also used some lace tape to embellish my photo. I can't get enough of Love My Tapes lace tape. I hope you've enjoyed my page! Thanks for visiting today.

Tuesday, September 23, 2014

Morning checklist with washi tape


Hello, Love My Tapes fan! This is Maya and today I am going to share a fun project that I hope will become an important part of my son's morning routine.

My friend told me about a clothespin chore chart she wanted to do for her kids and I immediately thought that it can really help me and my son with the morning tasks. After some changes to the original idea that what I came up with.


I covered a simple clipboard with patterned paper and added letter stickers to the top. I covered the seam between the "to do" and "done" halves with beautiful Love My Tapes washi tape.

Each clothespin represents a morning activity, It is covered with washi tape from both sides. I used a thin sharpie to write the task.

If this will work well for us I will make another set of clothespins for the bed time routine, using a different washi tape.

Hope I gave you some ideas. Thank you for stopping by today!

Monday, September 22, 2014

Box Card with Printed Washi Tape

Hello Love My Tapes friends. Marcia here today. I have been experimenting with printing on washi tape using my computer. Think about all the free fonts available. Not just fonts, what about dingbats? No, I am not talking about a stupid person, but a type of font. 

"A dingbat is an ornament, character or spacer used in typesetting, sometimes more formally known as a printer's ornament orprinter's character. The term continues to be used in the computer industry to describe fonts that have symbols and shapes in the positions designated for alphabetical or numeric characters."

Free fonts and dingbats can be found all over the internet. You could personalize your washi tape with endless possibilities. Want to see what I discovered....

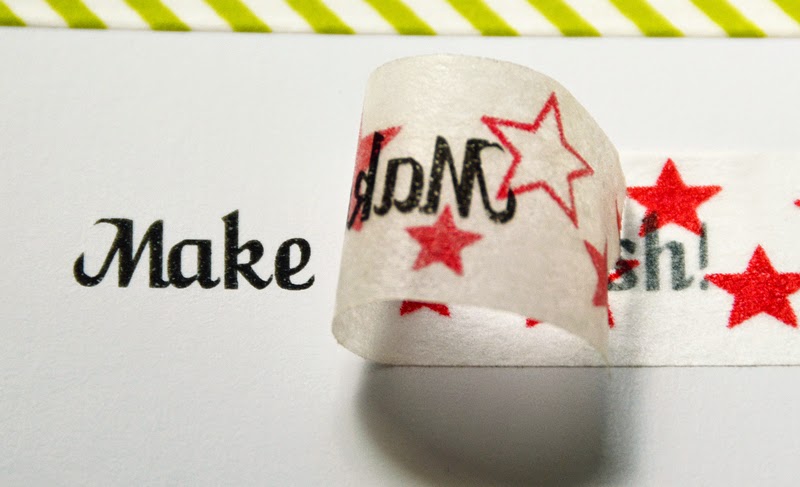
I created this word doc on my computer that combined some of my favorite fonts with some fun dingbats I found....


Print it onto glossy photo paper. (Very important so the washi tape will peel off easily.)

Layer a strip of washi tape over the top of the printed words or images. Choose washi tape with muted colors and patterns that won't be distracting.


See how some tapes were better options. The yellow easter eggs turned out best I think. The Robots with the blue stars ended up being too distracting. When you are ready to use the washi, gently peel away from the paper.


I have an inkjet printer. This technique will only work with inkjet printers. If you have a laser printer, check out this link for info How to print on washi tape at Ashbee Design. I did try printing directly onto the washi tape but the inkjet inks won't dry and will eventually smear. 

Here is what I created with my dingbat Santas (which by the way were a dead ringer for the Fancy Pants Merry Little Christmas collection!)


Don't worry, these cards fold flat for mailing. I even created a coordinating envelope.


I hope you give this technique a try.  If you like, you can download a PDF of my WashiDingbats file from here.
~Marcia

Friday, September 19, 2014

Washi Tape Luminary


Hi Everybody!
Jenny from Crazy About Cricut here, and it's time for another video for the Love My Tapes Design Team!!  I'll show you how to create a fun luminary to use as a nightlight or for home decor.  Enjoy the video :)


*Love My Tapes - floral washi tape
*Monster Bash Cricut cartridge - luminary base and top layer
*Mother's Day Bouquet Cricut cartridge- flower
*Art Philosophy Cricut cartridge - oval


TFL, and hope everyone has a chance to craft today :)

Wednesday, September 17, 2014

Black, White and Yellow Project Life

Hey everyone, Katie here! Today I'm sharing a recent project life spread I did using photos from our road trip to Arizona.


I wanted to mainly focus on the photos, so I didn't want a lot of crazy colors (even though I do love color). I decided to just stick with black, white and the yellow and orange of the sunset and mountains in my photos.
I went through my Love My Tapes stash and grabbed some of my favorite black and white tapes as well as the light yellow fabric tape, just to add a bit of color.


I used the washi tape as borders along the sides of my project life cards and my photos. It's such an easy way to add a bit of pattern to your photos without covering them up completely.

Thanks for stopping by!