Pages

Showing posts with label Jaclyn Rench. Show all posts

Tuesday, March 3, 2015

Altered nautical picture frame

Hi LMT friends!  It's Jaclyn here today to share an altered picture frame with you.  


I've had a stack of pretty new nautical themed papers sitting on my workspace that I've been dying to dig into.  However, since I had plans to alter a picture frame, I knew I would want more than just paper in my crafty arsenal to work with.  Lucky for me, LMT has a bevy of patterned tapes to fit just about any color and theme.  This red and white striped washi and light blue star print fabric tape were just begging to be paired among my list of nautical supplies.


The red and white stripe tape made a great backdrop for my overall design.  I simply laid strips of it along the length and width of each edge of the picture frame.  It went on smoothly and easily and creates a fun and coordinated look.


I used the light blue fabric tape to paper piece the cute little stamped sailboat image.  I love the added pattern and texture it adds to the stamped image.  Again, it was another quick and simple way to add the tape into my design.


Thanks for joining me today!  I hope you'll be back the rest of the week to see all the beautiful projects the design team has to share!

Saturday, February 21, 2015

A duo of happy and bright cards

Happy Saturday LMT friends!  It's Jaclyn here today hoping to bring you a little bit of sunshine and happy on your Saturday morning.  It's been snowy and COLD where I live in the Midwest, so naturally I've been craving anything and everything to help me stay warm - both physically and even in my crafting!  I've been reaching for bright and tropical colors to cancel out the cold and my two cards I have to share with you today, reflect just that!  Here's a look...

 
I originally started off these cards not intending to use a stitch of washi tape - *GASP*, I know, right?!  I was in the mood to attempt some watercoloring and wasn't even sure the end result would end up on an actual project at all.  After playing with watercolors, stamping, embossed images and even a little stitching here are the pieces I ended up with...


I knew that the rainbow of colors, would find a happy home as the focal point to a couple of cards.  I wanted the watercoloring that I had spent so much time on, to be the focus of the card, so I thought I would simply mount them atop a colorful cardstock base.
 
 
The end result was pretty, yes, but seemed a little too plan and was definitely missing something.  So, what to do?  I reached for my LMT washi stash, of course!
 
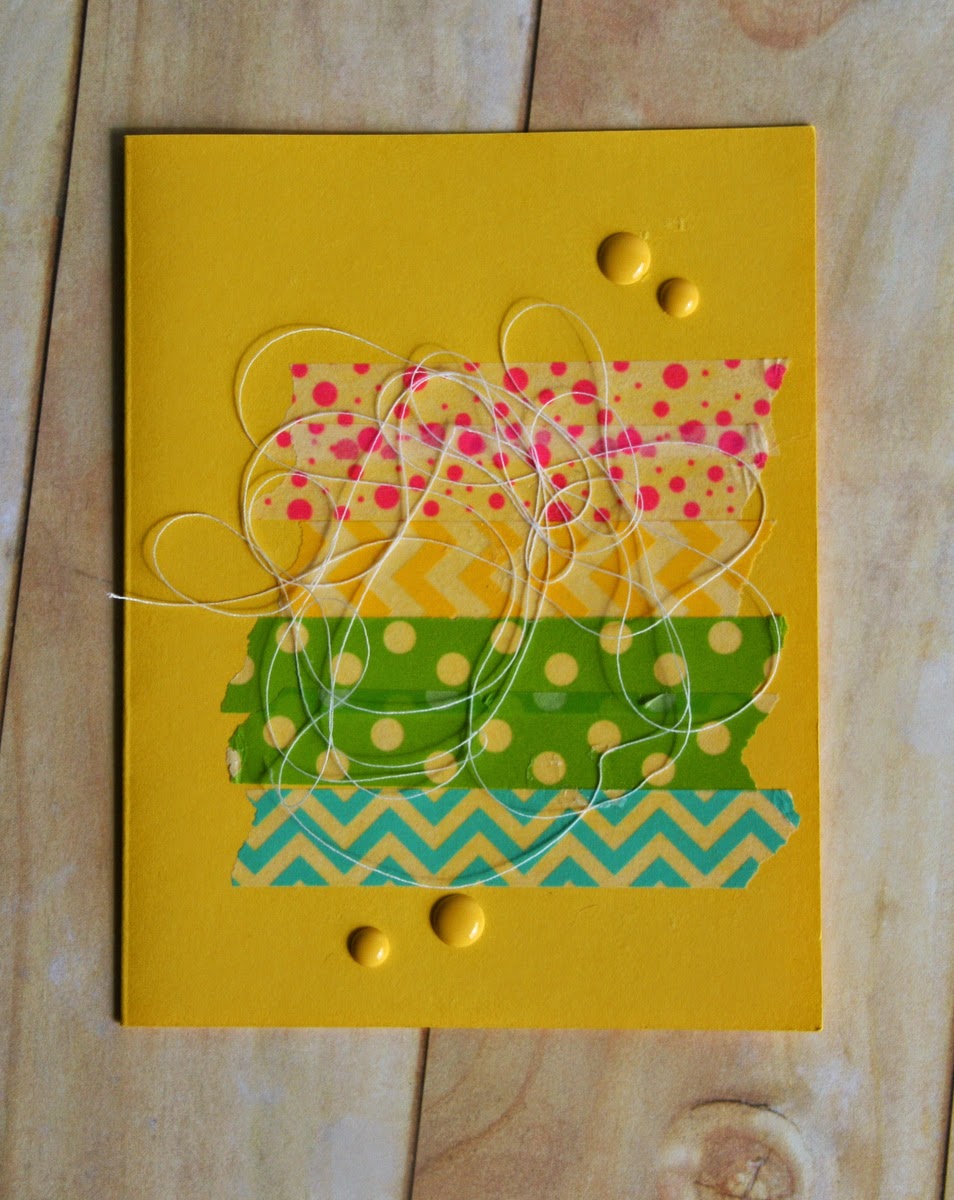
For the yellow card, I laid down strips of washi tape to match my rainbow of watercolors, accented with a couple of tone on tone epoxy dots and even added in a bit of messy thread to complete the 'artsy' look.


I used a bit of foam adhesive to layer and pop my watercolor piece over the background, and I knew my card was complete!


I was determined that the next watercolored piece (shown above) would look just fine on a solid background.  I had stamped and embossed that image in a bold black and even included a couple additional lines of sentiment.  I knew those two factors would give it more substance to stand alone on a card front.


Again, the results were pretty and the card could have been left alone at this point.  But I had such great success with the washi tape in the last card, I knew this card would benefit from some washi magic, as well!
 
This time, I decided to add some texture with a dry embossed background and a hint of lace tape.
 
 
This was definitely a more subtle transformation than the last card, but worked well since the watercolored piece took up a more substantial area of the card front.  I love the bit of texture the lace tape adds, as well as the focus it draws to the sentiment toward the bottom of the card.
 
 
I hope these cards have brought a little happy to your weekend! Come back and visit us soon, as the new DT girls will be filling up the blog in the coming weeks with all kinds of inspiring projects!

Sunday, January 25, 2015

Washi dot tutorial and shaker cards

Happy Sunday, LMT friends!  Hope your enjoying the end of a relaxing and crafty weekend.  It's Jaclyn here today to share with you a simple tutorial for creating a backdrop of washi dots on an interactive shaker card.  Here's a peek....


A close up shot, shows how the washi tape fills in the background on each circle while also remaining inside the shaker element.  Setting up the card this way allows the sequins and seed beads to float and move upon the surface of the washi dots for added interest and texture. 


How did I create this effect?  It was quite simple really!  Follow the steps below to create your own version.

I started with a standard A2 size card that was 4.25" x 5.5".  I cut a panel of cardstock that was a quarter of inch shorter on the height and length, as shown.  I then used a variety of sizes of circle dies to create a scattering of dots across my panel.  Note: be sure to leave at least a quarter of a inch between the dots, for easier placement of the washi tape later on.


Next, I lined up the panel on my A2 sized card, leaving an even border along all four sides.  I used a pencils to lightly trace each of the circles onto the card front.  This will allow for perfect placement of my washi tape.


The next step was to grab my stash of washi tape and start covering the penciled in circles on the card front.  I stuck to a gold and black color scheme, and pulled all of my tapes in that color family.  If you'd like to purchase these same tapes, you can now find them in our etsy shop!  Don't worry about how messy this step appears, because the panel you've previously diecut will cover up all of the rough edges and imperfections.  Just be sure to completely cover each circle and not overlap onto any nearby ones.


The final step is to create your shaker front.  I adhered a piece of an old page protector, that I cut to size, on the backside of my diecut panel.  This creates the window portion of the shaker.  Next you'll need to adhere foam adhesive along the perimeter of the panel, as shown.  The foam adhesive creates a pocket for which the shaker bits & pieces to move.  At this point, I usually carefully lay my sequins and beads onto my card front, and then remove the foam adhesive release paper, and adhere the front panel to the card.  If you've followed the steps correctly, it should line up just perfectly!


Here's one last look at the finished design! 


Thank you for joining me today on the LMT blog. 
 
If you missed the post from yesterday, you'll want to head on over to this post, to get yourself entered into the giveaway for a chance to win a bundle of our tapes and adhesive!


Friday, December 12, 2014

Pretty gift bags in a flash

Happy Friday! I hope you are stopping by to get some inspiration for crafty projects to work on over the weekend.  If so I, Jaclyn, have just the idea for you.  It's a quick, easy and beautiful way to dress up your gifts for the holidays. 


The supplies are simple and probably things you already have on hand:

plain kraft gift bags (I purchased mine at the dollar store - 4 for $1.00!)
glitter adhesive-backed cardstock
premade tags
coordinating washi tape
ribbon/twine
additional embellishments, you wish to add.

The first step is to create a glittery banner backdrop for each gift bag.  I cut a strip of LMT's glitter adhesive cardstock to 3"x6", notching the bottom edge.  Once cut, the chunky banner easily and securely adheres to the front of the bag.


The 'tags' I used are cut from a stack of Die Cuts with a View patterned papers.  I dressed them up with a few pearls, strips of coordinating washi tape, and a punched hole for adhering.  Ribbon and twine provide just the right finishing touch.


If you are embellishing more than gift bags this weekend, check out my previous posts here and here for ideas for dressing up baked goods and pillow boxes.  All of these examples can be customized for the occasion!

Friday, December 5, 2014

A glittery Christmas countdown

If you're a regular visitor here on the LMT blog, you've probably noticed that the design team girls have been having lots of fun with the 12x12 glitter adhesive sheets.  Well, it's Jaclyn here today to share with you another idea for this fun and decidedly festive product!

Since I have little ones at home, we love to find ways to countdown the days leading up to Christmas.  We've adopted the tradition of wrapping up 24 of our holiday books and unwrapping and reading together one each night before bedtime.  In year's past, sometimes the books get wrapped up neatly and other times they are all stuffed in the basket at the last minute (!).  This year, I prepped a little early and was able to wrap AND decorate each book with a glittery number tag, for each day of December.


The glitter adhesive sheets make this project oh-so-simple and quick, especially if you have access to an electronic die cutting machine.  I found a fun circular number file in the silhouette store by Karla Dudley.  By adjusting my machine's cut settings properly, I was able to cut through the glitter sheets with ease.


This left me with 24 custom made, glitter stickers that I then adhered to a circle of white cardstock for added effect and focus.


Have you tried cutting any specialty mediums in your electronic cutter?  If not, give it a try - the results are sure to be fun and addicting!

Wednesday, November 26, 2014

Lace Tape card backdrop

Hi Love My Tape friends, it's Jaclyn here today.  Do you need to whip up a quick card for the host/hostess of your Thanksgiving celebration?  If so, you're in luck!  I've got a quick and easy solution for you that's high on style and texture.  The secret ingredient to making this card both beautiful and simple is the lace tape backdrop.


To create said backdrop, all you need to do is trim a piece of cardstock down to fit your card front.  Since I created a standard 4.25 x 5.5" card, I trimmed my cardstock panel to 3.5 x 4.75".  Then, simply lay a series of horizontal lace tape strips across the cardstock piece, covering it in it's entirety.  The excess tape on the left and right edges can be trimmed to the same size of the cardstock width or wrapped around and adhered to the backside, as I've done here.


The lace tape backdrop adds some much texture, dimension and interest to the card.  It does a beautiful job of highlighting the simple, stamped tag and sentiment that are the focal point of the greeting.


So, if you're short on time but need a beautiful token of your appreciation this Thanksgiving season (or anytime, really!) - reach for your lace tapes to create a stunning and sophisticated starting point!


Wednesday, November 19, 2014

We love snow - and fabric tape!

Hello!  Jaclyn here today to share a scrapbook page with you.  I've had a stack of pretty LMT fabric tapes sitting at my work space, that I've been dying to use!


Aren't they pretty?  That light blue one looks just like the print on a cozy, warm, winter sweater, to me.  As I've been admiring these pretty tapes and enjoying the newly fallen snow out my kitchen window, I was reminded that I have yet to scrapbook some of my favorite snow pictures from last year.  So, I got to work with some patterned papers, a few punches, sequins and most importantly - that cozy blue tape to put together this festive page.


Since my title runs through the center of my design, overlapping a portion of each of my four photos, I knew I would need to do something to help it stand out.  A wide vellum notched banner helps to separate the title from the background photos.  However, I found that the vellum ultimately made the title blend a little too much into the background.


A strip of coordinating cardstock, machine stitching and that pretty blue fabric tape solved my dilemma!  The tape creates a nice 'frame' on both sides of the title, to draw your eye to the text then the photos.


Thanks so much for joining me on the blog today!  I hope I've inspired you to pull out your stash of fabric tapes and add them to your next project!

Tuesday, October 28, 2014

Glittery stars and washi tape


Hello LMT fans, it's Jaclyn here today.  Are you caught up in your scrapbooks?  I most certainly am not!  I just got around to scrapping my youngest son's preschool graduation pictures from back in May.  I'm glad I waited though, because LMT's new 12x12 adhesive backed glitter sheets, proved to be the perfect compliment to these pages!


I used a thin metal star die to cut a variety of stars from the black glitter paper.  They die cut through the paper so very easily.  I've mentioned this on the blog before but it's worth repeating - the glitter sheets do not 'shed'!  Oftentimes I avoid working with glitter because I hate the mess, but the LMT glitter sheets solve that issue!
 
 
As a bonus, I simply peeled off the release paper, to reveal an even sticky layer of adhesive that attached so nicely to my page.  Even adhering seamlessly to my textured cardstock background!


Lots of pictures on a page, sometimes means that I don't have a whole lot of space left for embellishment.  But washi tape can be squeezed in and layered just about anywhere.


Here I've used the black and white polka dot tape to look like several of the polaroids are 'taped' to the background.


Thanks for joining me today on the blog!  We'd love to hear how you're using the 12x12 glitter sheets on your crafting projects.  We hope you'll share with us and link up your projects in the comments!

Friday, October 10, 2014

Baked goods and pretty tapes

Hi LMT fans, it's Jaclyn here today.  Please tell me I am not alone in the fact that the cooler temperatures immediately put me in the mood to bake.  Anyone else have this 'problem'?  Something about pulling out the jeans, boots and sweaters initiates my craving for everything pumpkin flavored, warm and delicious.  Since the temperature has barely reached 50 degrees where I live within the past several days, I've succumbed to baking six loaves of pumpkin bread and four dozen snickerdoodle cookies!  I admit, its a problem! Ha!  But it would be even more of a problem, if I ate it all myself!  Luckily I have many friends and neighbors who appreciate my kitchen whims and are happy to indulge in surprise packages of goodies on their porch.

What does any of this have to do with the pretty tapes you come to see on this blog?  Well, just as I mentioned in my post last week, I often reach for my supply of tapes to pretty up my baked goods packaging prior to passing them along!


I've been gifting loaves up pumpkin bread like crazy.  I found these cute kraft and orange polka dot boxes at my local craft store.  While cute and decorative, they definitely needed to be dressed up!  I created a simple black cardstock wrap, to extend around the outside of each bread box.   At this point, I dug into my tape stash, wrapping some around the perimeter of each box and making darling, dimensional bows with the rest.


LMT is now providing you with awesome 12x12 adhesive-backed glitter sheets!  To keep with the Halloween theme, I used the black glitter cardstock to accent my cardstock wraps, as a base for my 'tape bows' and I even used a bit along the bottom edge of each tag.


The glitter sheets have a super strong adhesive, so there's no worry that they'll move once you have them stuck down.  What I also love about these sheets is they are no mess!  I punched, trimmed and cut various pieces from the black glitter sheet, and didn't have a strand of stray glitter anywhere on myself or my work surface!


That's all I've got for today, LMT friends. Enjoy your weekend!  We hope you'll come back and visit us next week.  The Design Team girls all received a bounty of new LMT products and we're eager to share the fun things we've been making with them, with you!


Friday, October 3, 2014

Pretty packages

Hi LMT friends, it's Jaclyn here today.  In my family we have a number of birthdays during the month of October.  I have already purchased several gift cards, but I wanted a way to present them to my recipients other than just tucked inside a card.  Pillow boxes and washi tape came to the rescue!  These simple supplies made for quick and pretty packaging to house my gifts.

I started by laying three side by side strips of the chosen tape next to each other, around the width of the pillow box. I then layered two strips of lace tape around the middle for some added texture.  The rest is finished off in no time, with a quick wrap of coordinating twine and a gift tag that is tied on and secured!


This floral tape has always been one of my favorites.  I love how the lighter colors pop against the black background.  The black lace tape and twine add a nice bit of texture and compliment the pattern well.


The fabric tapes work well for this project too!  Here I've used the pink and white stripe fabric tape, as my base, layering on the lace tape and twine again.


With the holidays quickly approaching, I know we're all searching for quick and pretty ways to fancy up our gift giving.  What's great about this project is that it can easily be customized to the holiday or occasion, based upon the tapes you choose.  I hope you'll give it a try!

Friday, September 12, 2014

Lace tape borders

Happy Friday!  It's Jaclyn back again today, to share with you a recent scrapbook page I created. 


The pictures I had to document this memory were plenty - therefore taking up a majority of the 12x12 page.  However, I wanted to be sure to add lots of texture and pattern to the page as well.  Because, well, half the fun of scrapbooking is adding in all the pretty products.  Am I right?! ;) Since I was limited on space, I used a variety of strips of patterned paper to create interest around and frame my block of photos.  To add in some additional texture and interest, I layered in a couple of lengths of lace tape.  The LMT tape proved to be the perfect compliment to my paper choices and I love the extra dimension it adds.


I can't end this post without noting that the cupcakes in these pictures were the BEST I've ever had!  So here's my PSA for today - if you're ever in Chicago or New York make it a priority to stop and stuff your face at Molly's Cupcakes!  And when you do, you can scrapbook the memory and reach for your stash of pretty tapes!