Pages

Friday, May 31, 2013

They're Baaaaack!

Some of you may have noticed that we didn't post a challenge last month. Well, never fear, they are back, my friends. The new design team has transitioned into their new positions. We are ready to inspire you and challenge you to embrace your creativity to make a project that fits our monthly theme. A lucky winner will be announced at the end of the month. Let's not forget the best part. PRIZES!!! 

Who's ready for this month's challenge!?! Here it is: 

Create a masculine-themed project

Father's Day is this month. Why not make a card or tag for dear old dad? If that's not your thing, create a card or layout for a little boy. Whatever you decide to do, make sure it fits the theme and uses washi tape in an innovative way. Are you ready? I think you are! Let's see what you got!!


Wednesday, May 29, 2013

Quick & Easy Treats!

Hi there!  Jenni here to share a quick idea and perfect use for washi tape!
I had to come up with some end of the year treats for my kids classmates...
I had a few ideas, but then I realized it was for 45 KIDS!  

I needed something fast, cheap and preferably something I could put my kids to work on!
Nothing sharp or complicated :)  We needed an assembly line!


I saw lots of similar ideas on Pinterest, but used Washi with mine!
I bought several boxes of cheap ice pops and had my kids make groups of three...times 45!

I had already printed out a little tag on cardstock to sign their name on
and we picked out washi in rolls of bright red, green, and yellow.

My son grouped the popsicles together and put the tags on top of each group.
Then my daughter and I came back with the tape, wrapped it around the popsicles 
and the label, adhering them all together and sticking the label to it as well!


This is the PERFECT activity for kids, because washi tape is so forgiving and re-workable...
And there is nothing dangerous, no scissors needed!
 { I thought this would be a cute pool party favor too! }

You can see all the Love My Tapes washi available on the website HERE
and check out the LMT BLOG for more tips & tricks from the rest of the DT Members
and a complete list of places where Love My Tapes can be purchased!

Thanks for stopping by and have a great last week of May!

Monday, May 27, 2013

Happy Memorial Day-- Layering and Washi Tape

Happy Memorial Day! How has your holiday weekend been? I hope you've gotten some scrappy time in. I have! It's Heather here today with a washi-licious page! I have a very simple idea for adding some pizazz to your layering in your scrapbooking. I love layering and the thought came to me that I could use my washi collection in my everyday scrapping. All you have to do is line up a piece of wash tape on the edge of a piece of paper and then just repeat that on all sides of the piece of paper. I think it helps accentuate unnoticed patterns! 

This could also be used to make a frame around your photo if you don't layer a lot. But if you do layer, then this is the perfect technique for you to use up some of your awesome washi tape that you've been hoarding! 


I mean, how cute is this little woodgrain washi here?


I hope you have a wonderful holiday!

Friday, May 24, 2013

Enhancing Your Projects with Washi

Happy Friday, LMT fans!  Missy here with you today to show how you can use a variety of colored washi tapes to enhance your projects and add some interest to them.  I just love rainbows, and I was in the mood to create something from scratch and not use any specific lines or collections.  I pulled out a rainbow selection of LMT washi tapes and my trusty paints :)  I took a sponge brush and watered down a squirt or two of each color and just washed it over a heart I hand-cut from cardstock.

I then took the coordinating washi tapes and added strips to each color section.  Then I added in some black chevron and striped tape to match my stamps and title.  I love the look and texture the tape gives.  You can see them better in my close-ups.


I just love the yellow striped tape!  I love how each one I used has a different shape on it...from stripes to dots to diagonals...such a great variety.


Another close up...


I taped over punched out hearts here and just traced around the edges.  I then just dipped my finger into each paint color and smudged some on.  Easy!


I hope this inspires you to take a little break from all the patterned papers and just create something from scratch...and pull out that washi tape to give it a little extra "oomph"!

Thanks for stopping by!  Have a wonderful weekend :)

Wednesday, May 22, 2013

Quick and Easy Gift

This project is so easy that I almost felt like I was cheating! It makes for a gorgeous one-of-a-kind teacher or hostess gift. You don't even have to be crafty to make it. I simply took a notepad and covered it in washi tape. Then I found one of those free giveaway pens you get at tradeshows and embellished it with the same tapes to create a matching pen and notepad set. Easy peasy lemon squeezy!!

Thanks for visiting and have a great day!!

Monday, May 20, 2013

Pin Wheel Flower

Hi, Everyone! Janice here to apologize for the late post on this lovely Monday morning and to show you how I created a super fun, washi tape pin wheel flower!  :)

Here's a picture of the pin wheel flower I made:


I started off with a flower die cut (Spellbinders Labels Twenty-Four) and covered it all over with different LMT washi tapes folding the  overhanging pieces over and to the back. (Sorry, I forgot to take a before pic of the flower without the center in place!)

Next, I created the center most part of the pin wheel by hot gluing a couple of buttons onto a flat head pin.

Then, using my piercing tool, I poked a hole through the straw I had chosen to be the stick part of the pin wheel.

 Then, I added some hot glue to a pony bead and slid the center part right through it (using a pair of tweezers as not to get burned).

I pushed the bead right up to the straw but made sure it didn't adhere to the straw in order for it to spin freely.


Finally, I snipped the head pin excess and put another dab of hot glue to cover the point.


And that's it!

Here's a little clip of me spinning the pin wheel.  :)

 Once again, I apologize for the late post but hopefully you enjoyed this little washi tape flower pin wheel tutorial!

Have a fabulous day!

Janice :)


Wednesday, May 15, 2013

Washi as a TOOL...

Hi there!  Jenni here today to celebrate a Washi Wednesday with you!

 And to suggest how fun thinking outside the box can be!  Especially with washi
It is the ultimate tool.  We all know it is pretty, comes in a gazillion styles, 
colors, patterns and  is a growing part of everyone's scrap embellishments...
But today, I want to focus on what a great tool it is too!

Washi tape is adhesive, but non-stick...not a lot of tapes can do that well!
There are lots of tapes made for masking on specific paper, watercolor papers especially.
Tapes that help hold it in place, create a border, prevent warping and help create a mask
for anything you can imagine!  I decided to use my washi to mask off a piece of 
watercolor paper & paint a loose interpretation of an ombre beach sunrise...


I have lots of washi that won't be used as often as some other patterns, 
and washi goes a long way...Put it to use too!  I started by taping my paper down to my board.


I tore a couple pieces of tape and used it to roughly divide the piece of paper into thirds.


I painted a pale blue wash over the top two halves and painted a sand color at the bottom.


I tore more pieces off and then tore each of those in half to get a rough edge.
I randomly placed those pieces of tape & kept painting washes on top off each other.
I didn't keep using more washi, I just moved the other tape down,gradually adding more color!


I finally pulled off all the tape pieces and the borders too.


Some paint got under the torn pieces, but I think it adds to the effect.
I made sure the border pieces were adhered well to create a clean crisp edge.
I stamped and embossed a piece of vellum with StazOn and gold Zing!, 
added a couple other embellishments and a piece of patterned paper.


Washi could be the ultimate tool!  So many uses!  
I challenge you to think about your collection in a different way, 
besides just embellishment, and to share it with us on the LMT Facebook Page!


Check out all the washi & other tapes available from Love My Tapes HERE!


Monday, May 13, 2013

Using Washi in Your Title

Hello there! It's Heather here today to share with you a new project I've made with Love My Tapes washi! I have done this technique before, but I made a fresh layout to showcase just LMT.
Washi tape is PERFECT for stabilizing your title. What do I mean? Take a look:


In this layout, I layered washi tape behind the smaller title stickers to keep the words from "floating" around. Just think how sad and left out the words "Golden Gate" would look if they weren't grounded to the page by the washi strips! I like using this technique when I have more than one word in my title, so the title can be cohesive and not look like I used too many alpha stickers on one page. 

By the way, I went to San Francisco a couple of weeks ago and LOVED it. We went for a yearbook conference for school. It was the first time I had been to a big city, and so it was a totally new experience for me. Plus it was extra special because my dad got to tag along. ;) 


Something a little extra I like to add to the washi is machine stitching. I thought at first my machine would go crazy with the adhesive on the tape, but it hasn't. I guess since it is kind of a removable adhesive it does ok. 


Thanks for stopping by the Love My Tapes blog today! I hope you are inspired!
Tapes I used:
Orange Floral

Friday, May 10, 2013

Mixing Washi Tapes with Stamps

Happy Friday, friends!  Missy here with you today to share a page I made combining LMT washi tapes with lots of stamping.  How often do you stamp on your layouts?  I love doing it on almost all of my pages recently.  I have found that stamping adds that little "extra" to my pages, and when I add strips of washi into the mix, it creates such a neat look.

I know this is May, and here I've posted a Christmas page...haha!  I wanted to finish up my holiday photos so I could get them into an album.  This type of layout also uses hardly any patterned paper.  I used some strips from some scrap papers I had left over from a stack that I bought over two years ago!  Once I added in the various washi tapes and stamps, you wouldn't even know there is minimal paper involved.
 

Another good (and fun) thing about this style is a lot of it is just random.  Stamp in random places, throw down some washi in other places...you really can't mess it up!


Another close up of the layered washi and stamping.


Buttons always add a nice touch, too :)


I hope this inspires you to give the "messy" look a try...get out those stamps and some washi tape and just start creating layers.  You'll be surprised by how fast and easy it is...and you can add in different colored inks as well to give more pops of color.

Thanks for stopping by today, and have a great weekend!

Wednesday, May 8, 2013

Washi You A Happy Birthday!


I have a little girl who is turning five tomorrow. We're gearing up for a fun, girly party on Saturday. When I asked my daughter what type of party she wanted, she said "I want a dress up party!!" She insisted that only girls be invited and wasn't happy when I told her she had to invite her brother! LOL!


No girly party is complete without frilly decorations. Of course, being the crafty mom that I am, I had to make them. And, of course, being a lover of washi tape, I just had to use it! Washi is so versatile. You can use it with so many things.


For instance, you can add them to your goodie bags.

You can wrap your utensils with it.

You can make medallions with it.


Don't forget the birthday banner!!


Here's the birthday girl!!

Monday, May 6, 2013

Fabric Tape Bow How-to

Hello, everyone!  Janice here with a little tutorial on how to make a bow with our fabulous Love My Tapes fabric tapes.  :)  

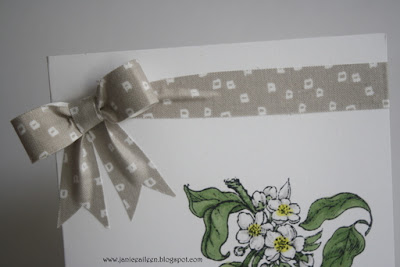
I received so many great comments on the fabric tape bow I made for the Pretty Little Studio + LMT blog hop that I thought I'd show ya how I did it!  Here is the card I made with the fabric tape bow:
Isn't that squirrel die cut just darling?  

Alright, so let me show you how to create your own fabric tape bow! 

 Cut one strip of fabric tape long enough to reach across the card.

Next, remove about two inches or so of the tape backing and pinch the end.

Adhere the pinched end about an inch from the side of the card you want your bow to sit first, leaving the gathered section the pinch creates raised as you adhere the rest of the tape to the card.

Next, cut a strip of tape about 4 1/2" long and, with the backing still in place, fold it in the bow shape shown below. 


Now, pinch the middle section together to create a gathered look in the center.

Cut a strip about one inch long then cut it in half lengthwise.

Take the backing off and wrap it tight around the center of the bow.

Take a pencil. marker or pen and open/give shape to the bow loops a bit.

 Next, cut two strips of tape for the "ends" of the bow and with the backing removed, pinch on one end and cut a triangle out of the other end (on both strips).

Now you're ready for the bow to come together!  Adhere the two end strips to the card only adhering the sides and end to create that gathered section that gives it a "real" tied bow look.  

Glue down the bow loops and...voila!  It looks like you took a ribbon and tied a bow right onto the card! 


I hope you found this tutorial helpful!  If you have a chance, give the fabric tape bow a try and post it on our Facebook page, I'd love to see your creations!  You can go HERE to find the fabric tape I used, from the Fabric tape set called "Camellia."  

Until next time, 
Janice  :)