Pages

Thursday, July 31, 2014

Altered plastic berry box


Hello Love My Taps Fans! This is Maya and today I will share with you a simple craft - altered plastic berry box. My box actually came with fresh figs. The figs were delicious and the box was too cute to throw out. I put it on my craft desk and decided I will certainly use it for something.

 
After more thoughts I decided that it can use some improvements. I pulled out two rolls of beautiful Love My Tapes fabric tape and weaved it through the plastic bars leaving the paper backing intact.


 The secure the tape I peeled about 1/2" of the backing and cut it off.

The whole process took about 10 minutes and I had a cute storage container for my craft room.
 It will be perfect for my most used washi and fabric tapes.

 It can also hold my favorite adhesives.

Or it can stash an emergency supply of snacks for the late night crafting time.

This project can be easily done with kids. Hope I gave you some ideas for creative re-purposing,
Have a great summer!

Wednesday, July 30, 2014

Die Cutting Washi Tape


Hi Everybody!
Jenny from Crazy About Cricut here, and it's time for another video for the Love My Tapes Design Team!!  Today I'm showing how to cut through washi tape using your die cut machine.  Enjoy the video :)


TFL, and hope everyone has a chance to craft today :)


Tuesday, July 29, 2014

Fabric Tape-Bound Mini Album

Hello! Tessa here with an easy way to make a mini album using fabric tape from Love My Tapes and basic shipping tags.


This little book is filled with quotes inspired by my One Little Word for 2014.


To make the tag book, I started with five pre-made tags. I trimmed apart a 6x6 piece of patterned paper and adhered pieces to the bottom of each tag.


To attach the tags to each other, I cut a piece of fabric tape and attached it to the edge of one tag. Next, with a space of about one sixteenth of an inch in between, I secured the next tag to the same piece of tape. I repeated that process for all five tags, then flipped the book over and added tape to the other side. By leaving a tiny bit of space between the tags, I allowed for the crease when the tags are folded up. The fabric tape will keep the tags secured together, as well as hold up to repeated folding.


With all the fabric tape designs available from Love My Tapes, you are sure to find a style that will bind your next mini album beautifully. For more photos and more about my one little word, feel free to visit my blog today. Thanks for stopping by!

Saturday, July 26, 2014

Washi Tape Bracelets with Dana


Hi! Dana here today sharing some more bracelets that I created with Washi Tape. Unlike my last bracelet that used paper, wire and beads along with washi tape, these bracelets are 100% washi tape and are so simple to create that I made mine while sitting poolside!


If you have ever made a chain out of Starburst candy wrappers, you are already familiar with this folding technique. I cut pieces of washi tape to 2 and 5/8 inches, folded them and linked them together. This project was fun and easy to create, and with the wide range of Love My Tapes washi tape designs, highly personable to individual tastes. I scored some major points with my young daughters with these mustache bracelets.

Thanks for stopping by today!
~Dana Tatar

Friday, July 25, 2014

Quick and Simple with Washi Tape


Happy Friday!  Rebecca here to show how washi tape is perfect for creating a quick and simple card.  No patterned paper necessary!  Here's how to create a card in four easy steps!


  1. Lay two pieces of washi tape down toward the bottom of your card side-by-side, but not overlapping.
  2. Stick another piece of washi on the lower portion of your wood veneer embellishment, then adhere using adhesive foam.  Be sure to line the tape on your wood veneer up with the tape below it, if the tape you are using has a repeating pattern.
  3. Stamp your sentiment on the wood veneer.
  4. Add a few sparklies.
Ta-da!  I told you it was easy!  Hope you all have a wonderful weekend!

Wednesday, July 23, 2014

Tape Sunburst

Hey guys, Katie here! For Memorial Day weekend this year we took a camping trip to Mustang Island, which was super fun. While there, I got a lot of good photos, so I wanted to create this layout using some.

I decided to make a sunburst using both fabric and washi tapes to mat my photos on. It was pretty easy, I just took a piece of paper in the size that I wanted and started layering tapes in a sunburst pattern.


I love sunbursts! Have you ever used your tapes for something like this?

Thanks for reading! -Katie

Tuesday, July 22, 2014

Smashing with Washi Tape

Hello! Tessa here, with another SMASH book page to share. Washi tape is a staple of a SMASH booker's stash, but some of my SMASHing friends say they get overwhelmed with the choices and don't know exactly what to do with the tape. Today, I have two tips for my friends. First, choose tapes within the color palette of your project. I typically choose 3-5 tapes to work with, less if I am also using patterned paper. Second, use your tapes as small pops of color, placed to balance out your composition. Here's how I followed these tips on a recent page:


Here I added a layer of the aqua heart tape over a layer of the pink scalloped tape to anchor my photo. I love how both tapes play with the colors from the nearby floral patterned paper.


Here, I tucked a bit of the pink scalloped tape under my layers for a pop of color behind the rose sticker.


And here I added the aqua heart tape to the edge of a pocket page card for a pop of blue.


I hope these simple tips have you reaching for your washi tape stash when sitting down to SMASH book. For more photos of these pages, see my blog. Thanks for stopping by!

Monday, July 21, 2014

Art Journaling and Fabric Tapes

Rebecca, here!  I love all of the Love My Tapes products, but when it comes to art journaling, I really love the fabric tapes.  They absorb color beautifully and remain flexible.

Here's a very simple way to start using fabric tape.  Just start with random strips of fabric tape.


Next, stamp your title and any other textures.  Next I take my paintbrush, dip in a little water, rub on my distress ink pad and start applying to my page and fabric tape.  And here you go!


A very simple and quick page using fabric tape!  Do you use washi and fabric tape in your art journal?  We'd love to see!  Please link up in the comments below!


Friday, July 18, 2014

Using Washi to build a Mixed Media Background

Hello Love My Tapes friends!  Marcia here today with a washi tape mixed media layout to share with you. Did you know that washi tape is a fabulous way to add layers on a mixed media background. On my layout I layered pieces of torn paper and washi tape, then added some gesso, modeling paste, and inks. Take a look ...


Here is a closer look. The washi tape I used had text on it. Do you see it? The torn paper and torn edges of the tape give my layout a grungy feel


I hope you give this technique a try. Have a great week!
~Marcia

Thursday, July 17, 2014

Keep Calm, use our Adhesive

So by now you have all heard and seen many projects created with our variety of Washi Tapes, Fabric Tapes, and our Lace Tapes.  Today I just want to remind you that we also carry awesome double sided adhesive. Our adhesive comes in cute pink plastic cases.
 
I had to create a few custom orders of "KEEP CALM" signs.  So I knew I needed a strong adhesive to make sure my letters did not fall off.
 
I am using heavy glitter paper and attaching it to a heavy poster board, then putting that board onto a
shiny gold poster board.. lots of  heavy layers.
 
The poster is going to be hanging up in an elementary school most of the year.. so I need the letters to stay in place.
 
 
Cutting my letters with my cricut machine.
See our cute pink adhesive tape runners~

My supervisor.

Finished poster.  I only used
LOVE MY TAPES tape runner.


The supplies I used to create my
Keep Calm sign.
 
What I also like about our tapes is that they don't break as easy as some other adhesives.  I use this tape in my kids classes and usually they are the first to break apart the adhesive.. but so far not one of these have broke.  So when you go to place a washi tape order, remember,

 
KEEP
CALM
AND
LOVE MY TAPES
HAS
ADHESIVE
TOO
 
Have a great day!

Wednesday, July 16, 2014

Elephant Card with Washi Tape Background


Hi Everybody!
Jenny from Crazy About Cricut here, and it's time for another video for the Love My Tapes Design Team!!  I used the awesome zebra print washi to create a fun background!  And have you ever tried stamping on washi??  Check it out, and I hope you enjoy the tutorial :)


*The Royal Shoppe - Action Wobbles
*Miss Kate Cuttables - Baby Elephant SVG
*Craftin' Desert Divas - Punny Stamp set
*Core'dinations - cardstock
*Love My Tapes - zebra print washi tape


TFL, and hope everyone has a chance to craft today :)


Monday, July 14, 2014

Washi to the rescue

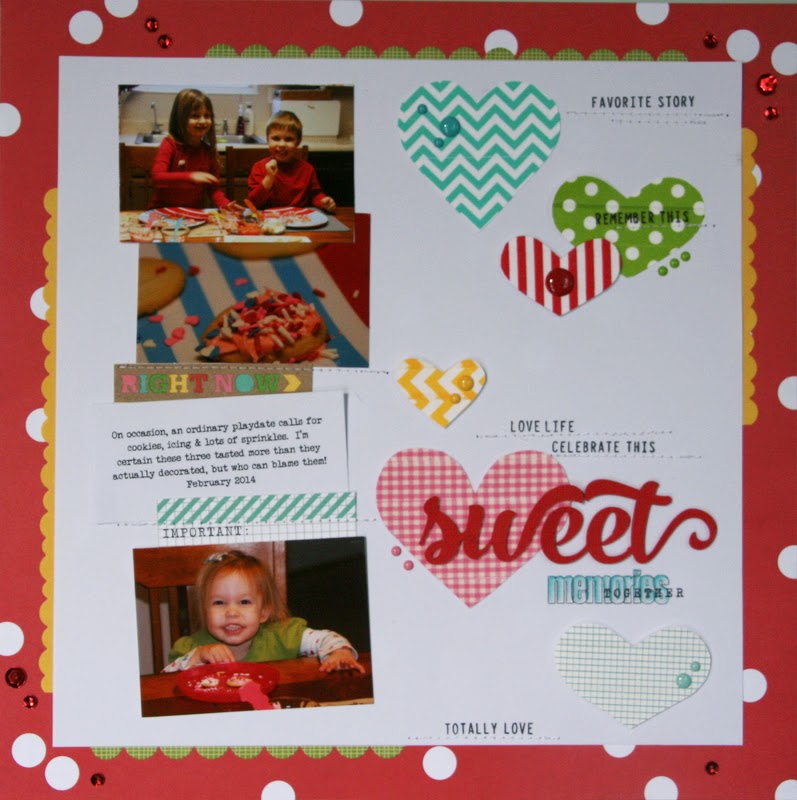
Hi Love My Tapes friends!  It's Jaclyn back with you today. I thought I'd start off this post by posing a question to you all.  So, here it is... when scrapbooking, do you sometimes run across a set of pictures that you just can't seem to coordinate or make work with the patterned papers in your stash?  This happens to me from time to time and I've recently been reaching for my stash of washi tape to remedy that issue.  Washi to the rescue! ;)

The page I'm sharing today features a sweet memory I wanted to document, but the colors in the picture just didn't seem to work with any of the paper I had on hand.  I did find a sheet that closely matched the red hues from my photos and ended up using it as a background.  But to match the mood and memory of the pictures, I knew I wanted to work in more color.  My washi tape helped me do just that. 


I ended up using the washi similar to how I might have used a coordinated patterned paper.  I simply layed down sections of the tape onto some scrap paper, and hand cut various heart designs to sprinkle along the right side of the page.  Using the washi allowed me to incorporate only the colors I wanted into my design, but still provide lots of pattern and interest.


And because the washi is thin like paper, I was able to treat it just like paper by stamping on it and even sewing through it.


I hope this gives you another 'excuse' to pull out your stash of washi tape when you're putting together your next scrapbook page!  If this idea inspires you, put a link in the comments to share with us!
 
Thanks for stopping by today!


Sunday, July 13, 2014

Washi Bead Bracelet with Dana


Hi Love My Tapes Fans! Dana here today sharing a bracelet that I put together with some washi beads that I made with cardstock and washi tape. This project was fun and easy to create, and with the wide range of Love My Tapes washi tape designs, highly personable to individual tastes.


I didn't want use too much of my washi stash to create this project, so I made the beads from strips of cardstock that I cut the width of the washi tape. Once I rolled the cardstock into beads, I used washi tape to hold the paper beads together. I love that the washi tape acts as both an adhesive and as a colorful design element!

I strung my washi beads onto a piece of wire, separating each paper bead with two glass pony beads. I modeled my beads after a design tutorial by BeyondBracelets. Check out her YouTube Challenge for more fantastic videos.

I hope I have inspired you today!
~Dana


Thursday, July 10, 2014

Decorating on the go

Hello, Love My Tapes fans! This is Maya and today I will share a quick decorating project.

Right now I am on family vacation in Israel, spending the weekend with my sister and her family at beautiful B&B in kibbutz Lohamei HaGeta'ot. We arrived in the afternoon and after we settled down in our rooms we started getting ready for dinner. While the men worked the grill and my sister was in the kitchen I pulled out few rolls of washi tape I brought with me, an empty chocolate tin and made a cute vase for our dinner table.


I started with an empty tin of chocolate truffles (that were delicious by the way) and three rolls of chevron washi tape.

 I peeled off the tin wrapper and added four rows of grey washi tape.

I filled the gaps with green and red washi tapes. I found the flowering branches in our B&B backyard.

 The tin is the perfect size to store the washi tape rolls when it is not used as a portable vase.


The whole project took about 15 minutes and made our family dinner even more special.
I suggest next time you are travelling, throw few rolls of washi tape in your bag, you can never know when you will need them.

Thank you for stopping by today!

Tuesday, July 8, 2014

Using Gold/Black Tapes for Stylish Cards

Hi everyone, Katie here! Gold is a pretty trendy color right now, so I decided to use the gold stripe washi tape with a couple of my favorite black and white tape to create these stylish cards.


On my first card I used the gold tape next to my alcohol inked patterned paper, and added a strip of the black chevron tape on top to separate the two.


For my second card I actually used the gold tape as a border around my paper. I layered the gold tape halfway on the edge of my paper and folded the extra behind. I also used the black and white polka dot tape as a border on my card base.


I finished off my cards with some stamped images (using stamps from Paper Wings Productions) and bling from Q&Co.

I love being able to add the gold trend to my projects using this fun tape. I also used the Love My Tapes tape runner to adhere my paper and stamped designs down.

Thanks for stopping by today!