Pages

Friday, August 29, 2014

Using Love My Tapes in your Art Journal

Hey guys, Katie here! Today I wanted to share with you a few of the ways I use Love My Tapes washi in my art journal. What I love about playing around in my art journal is that I can use all sorts of media, including washi tape. Below are a few ways I've used tape in my journal recently.


Using them as a border around the page- I use this technique quite a bit in my journal.


Use colored lace tapes- I loved the technique Tessa used for coloring the lace tapes with gelatos, so I used some orangey and melon colored gelatos to tint my lace tapes for some project life cards. I had some of the dyed tapes leftover and used them here in my journal.


Layer tapes to make a background. I haven't finished this page, obviously, but I was playing around with my tapes and wanted to create a layered background.


Ruffle your tapes- this works especially well with the fabric tapes. I ruffled the blue raindrop fabric tape along the right side of my journal page here.


Use all tapes of one color. I already shared this journal page here on the LMT blog, but I wanted to add it in to this roundup.


How do you use tapes in your art journal?

Thursday, August 28, 2014

Washi Tape Bubble Cap Embellishments


Hi Love My Tapes fans! Dana here today sharing a piece of family history. I was so inspired by Tessa's Fabric Tape-Bound Mini Album that I had to make one for myself! A family member posted this photo and some of the history about it on facebook. I know almost nothing about the older generations of my family so this find was a real treat.


I followed Tessa's instructions to assemble this album and then filled it with information, photos and some washi tape bubble cap embellishments that I put together with my Epiphany Crafts Shape Tool.


For more information on how to create these patterned bubble embellishments, see my previous post.

Thanks for stopping by today!

~Dana

Wednesday, August 27, 2014

Decorative Clips


Hi Everybody!
Jenny from Crazy About Cricut here, and it's time for another video for the Love My Tapes Design Team!!  Today I'll show you how to turn ugly, promotional clips (you know, the kind they give away for publicity) into awesome clips to hang up your kids artwork, notices, and more!  Enjoy the tutorial :D


TFL, and hope everyone has a chance to craft today :)


Tuesday, August 26, 2014

Washi bookmarks

Happy Tuesday, LMT readers, it's Jaclyn here with you today!  If you're area of the world is anything like mine, all of the local student and teachers have begun a new school year within the last week or so. 

As we all know, the start of the school year brings about shiny new school supplies, backpacks, packed lunches, and homework galore!  For my kid's, their nightly homework assignments almost always includes reading. Homework can sometimes be a struggle with my boys, so I'm always looking for a way to add a little fun to it. What could make that reading assignment more fun and more tolerable for both kids and parents alike - colorful and handmade bookmarks, of course!


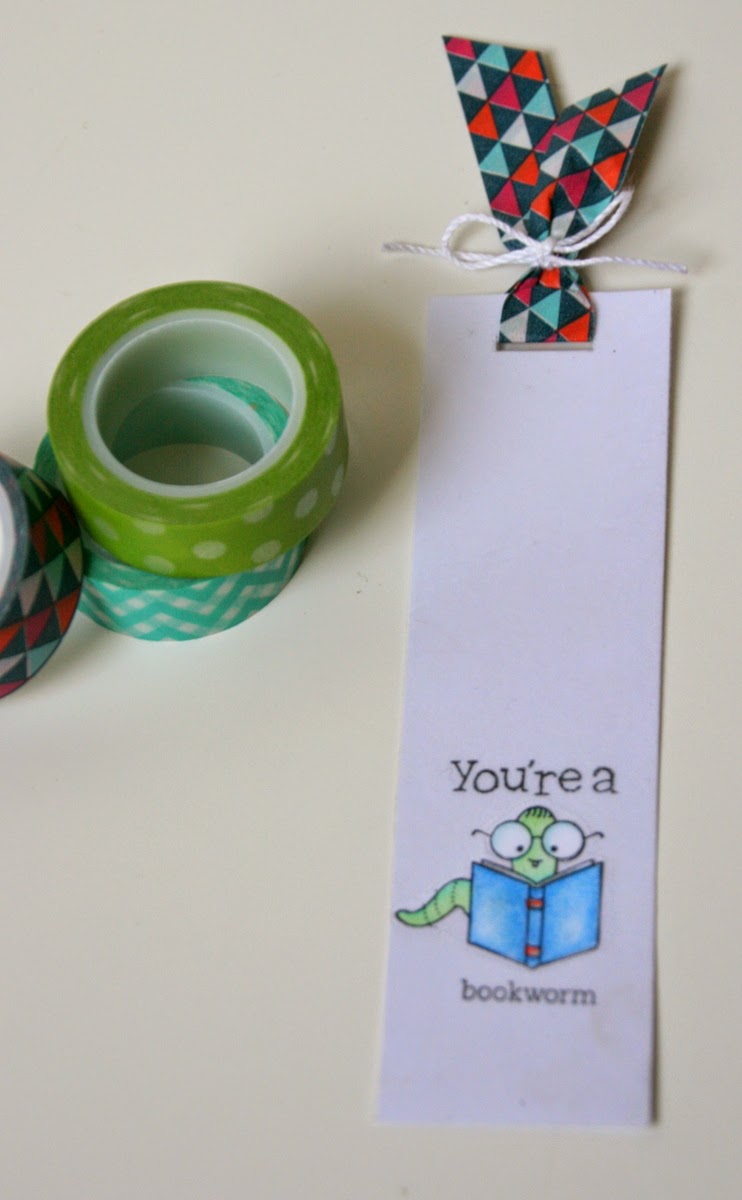
As you can see, these aren't just any ordinary bookmarks.  Instead of a ribbon or tassel to draw attention to your saved page - I've adorned them each with what else, but washi tape!


The bookmarks are simply constructed of scrap cardstock and pretty stamped and colored images.  The cardstock rectangle measures about 1.5' x 6'.  Once cut to size and decorated, I used some at home laminate sheets to cover each bookmark and make them more durable. 

 
I cut a small opening in the top of each bookmark, just slightly larger than the width of the tape.  Next I pulled a piece of washi tape off the role that was around 9" long. I then folded the tape over onto its self (sticky sides together), being sure to try to line up any pattern - since the tape is somewhat transparent.  Now that the sticky part of the tape isn't exposed - it works just like ribbon or string, to thread through the hole you've pre-cut in the top of the bookmark.
 
 
To secure the washi tape into place, I simply tied a knot of string and looped it into a tight bow to secure.  On the cupcake book mark, I even added an additional sentiment that I simply tied on along with the string.


The real show stopper on these is the washi tape 'marker'.  And with a stash of tape you could dream up all sorts of colors and combinations. 

Thanks for stopping by today! Let us know if you give this idea a try.

Monday, August 25, 2014

Mason Jars

Hello! Tessa Buys here. I recently found some cute Mason-type jars at my local dollar store. I picked up several and decided to use Love My Tapes fabric tapes to decorate a pair of jars as a birthday gift:


I loved that the jars were smooth all the way around, which makes the tape stick beautifully. I decorated each jar with the same band of tapes.


The flower vase jar has a flower frog lid, but the candy jar lid is decorated with tapes, too.


I punched out a 2.5 inch circle of cardstock then applied strips of fabric tape to the cardstock. When the circle was completely covered, I trimmed the edges. I placed the circle on top of the lid and under the ring.


I'm sure I'll use Love My Tapes tape to decorate the jars that I have left. It's an easy way to quickly and beautifully take a plain jar to pretty gift container. Thanks for stopping by today!

Saturday, August 23, 2014

Upcycled Chore Chart


Hi Everybody!
Jenny from Crazy About Cricut here, and it's time for another video for the Love My Tapes Design Team!!  Today I'll show you how I took a boring, ugly old day of the week chart and turned it into an awesome lookin' chore chart!  


Here's a peek, but watch the video to see the whole board :)


TFL, and hope everyone has a chance to craft today :)


Friday, August 22, 2014

Clean and Simple Washi Cards

Hello Love My Tapes friends! Marcia here today with a couple of clean and simple cards that use washi and fabric tape in the negative space cut out from the card base. There is no pattern papers used. The tapes are the star of the show.


You can use your electronic or manual die cut machine to create the shape. Strips of tape are adhered to white cardstock and then on the inside of the card front. Add a sentiment, some enamel dots, and some twine.


Thanks for stopping by,
~Marcia

Tuesday, August 19, 2014

Mustache Charm Necklace


Hi Love My Tapes fans! Dana here today sharing a super fun mustache necklace. I created this trendy piece in less than 5 minutes. A quick and easy craft like this would make a great gift. Try making two of the same for friendship necklaces!


I used my Epiphany Crafts Round 14 Shape Tool and coordinating Bubble Caps and Metal Charms. I placed a small strip of washi tape on a scrap piece of white cardstock, centered a mustache in the shape tool, topped with a bubble cap and punched. I then popped the bubble cap into a metal charm. With no messy glues or glazes, no smelly resins or epoxies to mix, and no drying time, I'll be using my washi tape with these supplies again soon!

Thanks for stopping by today!

~Dana

Thursday, August 14, 2014

Washi For Borders

Hello Love My Tapes friends!  Marcia here today with a layout to share with you. Washi tape is a great way to add borders to a layout or a card ...


Borders help keep the eye from traveling right off the page. This star washi tape was the perfect choice with all the other stars in the design too. 


Once I had the tape adhered to the front, I folded it over to the backside. You can see the same washi around my photo.

Give some washi borders a try. Have a great week!
~Marcia

Tuesday, August 12, 2014

Washi - both functional and decorative

Happy Tuesday LMT blog readers, it's Jaclyn here today. I'm excited to share a card with you, where I used my stash of washi tape to serve both decorative and functional purposes.  Here's a look at the card front....


The black and white polka dot strip of tape serves as a pop of pattern and interest on this otherwise simple and subtle card front, but the real fun comes in the functionality that the tape serves...


Fun, huh?!  The washi tape creates a hinge at the top of the square panel on the front of the card, allowing it to be flipped open to reveal the remainder of the greeting and a little surprise for the recipient!  Hiding this surprise on the front of the card base allows for plenty of room to add a personal message to the recipient on the inside.

Birthday cards are fun to make anyway, but adding a unexpected or hidden element makes them even more special.  This washi hinge is an simple, easy and doable solution to add that pop of surprise to your next card creation!  Let us know in the comments, if you give it a try.

Thanks for stopping by today, friends! 

Monday, August 11, 2014

Washi Tape Gift Wrap

Hello Love My Tapes friends!  Marcia here today with a washi tape gift wrap idea to share with you. Did you know that washi tape is a fabulous way to add pizzazz to a wrapped gift. I was headed to a wedding shower last Sunday and thought my gift wrapped package was boring. Plain silver paper and I didn't even have a bow. Then I remembered I had this incredible wedding themed washi tape. Washi tape to the rescue! Take a look at my gift now ...


Want to see how I made that bow?  I thought you would.

1. I applied washi tape to white cardstock and trimmed the cardstock into strips.


2. Glue the strips so you have 3 loops about the same size. You will also need one smaller loop for the top of the bow. 


3. Arrange washi loops on top of each other and put a staple or two through the middle.


4.  Add some twine loops too if you want. Then tape the smaller loop on top.


Well the bride is a scrapbooker and was so thrilled with the gift wrap that she saved the wrapping. That washi tape will peel right off when she is ready to use it on a layout :) 

I hope you will be adding some pizzazz to your own gifts that need wrapping. Have a great week!
~Marcia

Sunday, August 10, 2014

Tape Mosaic Art Journal Page

Hello! Tessa here with another smash book/art journal page featuring Love My Tapes. I love a good quote and I thought it would be fun to display my favorites in this smash book. For this page, I decided to mix stickers, handwriting and strips of fabric, lace and washi tapes to create a mosaic:


I didn't have a plan; I just started at the top and worked my way down. I adhered my first stickers, then added a strip of lace tape that filled the next space. I wrote out a quote, then added more tape. To make it visually interesting, I didn't always use one solid piece of tape all the way across the page. Instead, I tore pieces from different rolls, creating a mosaic effect.


Once all the quotes and tapes were down, I added number stickers to make it more list-like.


This is a great way to get a lot of designs onto one project, as well as a great way to use up small pieces you might have left on a roll. Thanks for stopping by today, and if you're in the mood for more smash book pages, you can visit my blog today for Smash Sunday (there's more washi tape, too!).

Saturday, August 9, 2014

Washi tape meets a sharpie

Hello, Love My Tapes fans.! This is Maya and today I am going to tell you a story about an ordinary gray washi tape that meets a sharpie, actually three sharpies. 

Not really :) But I am going to share a layout and show you how great sharpies work with washi tapes.

I made this cute layout with photo of my oldest daughter from 9 years ago. I used papers and stickers from Samantha Walker's "Cool Summer" collection for Carta Bella.


I used two pieces of pink washi tape to anchor the corners of the paper mat.


To draw the attention to the photo I added few strips of gray chevron washi tape to the both sides of the photo. I used green, turquoise and blue marker to color the tape.

It worked really well and did not smear at all. It is a great way to change the look of the washi tape and make it work with any color scheme.

Hope I inspired you to experiment with some sharpies and washi tape. Thanks for stopping by!

Friday, August 8, 2014

Washi Tape Covered Pencils


Hi Love My Tapes fans! Dana here sharing some washi tape covered pencils that are sure to go straight to the head of the class. My daughters are headed back to school in a couple of weeks and we thought it would be fun to dress up some pencils for the upcoming school year.

I chose colorful patterned pencils to cover with tape. Several of the Love My Tapes washi tapes with white in the design are semi-translucent, so the color shows through the tape for a cool effect. I used two different patterns of tape for each pencil and then covered the seam with lace tape. This project was quick and fun and I didn't need any additional adhesive! Also, the washi tape is thin enough to not effect sharpening in any way.


I have a feeling I'll be dressing up more pencils for their friends! Thanks for stopping by today!

~Dana

Thursday, August 7, 2014

National Peach Month PL Cards

Hi everyone, Katie here today! Did you know it is national peach month? I love anything peach flavored!

I wanted to document my love of peaches, so I used a photo I posted on instagram of a peach milkshake and created these cards for Project Life.


I loved the technique Tessa used for coloring the lace tapes with gelatos, so I used some orangey and melon colored gelatos to tint my lace tapes to better match my cards.

I also used both a yellow and green fabric tape. I layered the yellow fabric tape with the lace tapes, but for the green fabric tape, I lined them up on paper and cut peach leaves out of it.


The tapes I used are pictured below-


Do you love peach flavored things too? It's my second favorite flavor- right after pumpkin flavored things!

Thanks for stopping by! -Katie