Pages

Saturday, May 24, 2014

Lace Tape Birthday Crown


Hi Everybody!
Jenny from Crazy About Cricut here, and I'm so excited to be doing another video for the Love My Tapes Design Team!!  I have a fun new project today using the gorgeous Lace Tape!  Enjoy the video :)


TFL, and hope everyone has a chance to craft today :)

Friday, May 23, 2014

Washi Tape Art Journal Page


Hi everyone, Katie here! I creating pages in my art journal. Sometimes I journal, sometimes it's just art. Today I'm sharing this page I made using washi tape, stickers and a currently card.

I received some lovely red washi tapes in my design team package. I used those, as well as a muslin/canvas fabric tape and a script washi tape on my page. They went really well with these Dream stickers I had that I've been wanting to use.

As you can see below, I started the page by making a grid with the stickers and tape.
After that, I gave it a wash of white paint, stenciled on a few feathers and attached a card with some journaling by using the black chevron tape. Overall, it was a pretty simple page, but looks really great with all of the patterns from the tape!


Another recent projects I want to share is this simple card. I love how bold the black tape is. It makes a great focal point.

Have a great day! -Katie

Thursday, May 22, 2014

Lace Tape Makes a Lovely Border

Hello! Tessa Buys here with a design tip and a layout I created recently with my new lace tape from Love My Tapes. I have long been a fan of lace tapes because of how easy they make adding texture and pretty detail to a page. This layout is of my new little teddy bear, Adlyn:


I began designing the page with a lot of "white space" - the white space being that gorgeous Prima patterned paper. As I went along, I realized that I wanted something more interesting between the top portion and the patterned paper portion of my layout, and the lace tape instantly came to mind.


Color-wise, the white blends beautifully, but the dimension the lace gives makes the hard break from pattern to solid white more interesting and beautiful.


The next time you're looking for a creative border or edge for your project, consider lace tape. Easy, pretty, and definitely an eye-catching. Thanks for stopping by and have a lovely day! Tessa

Wednesday, May 21, 2014

Washi Action

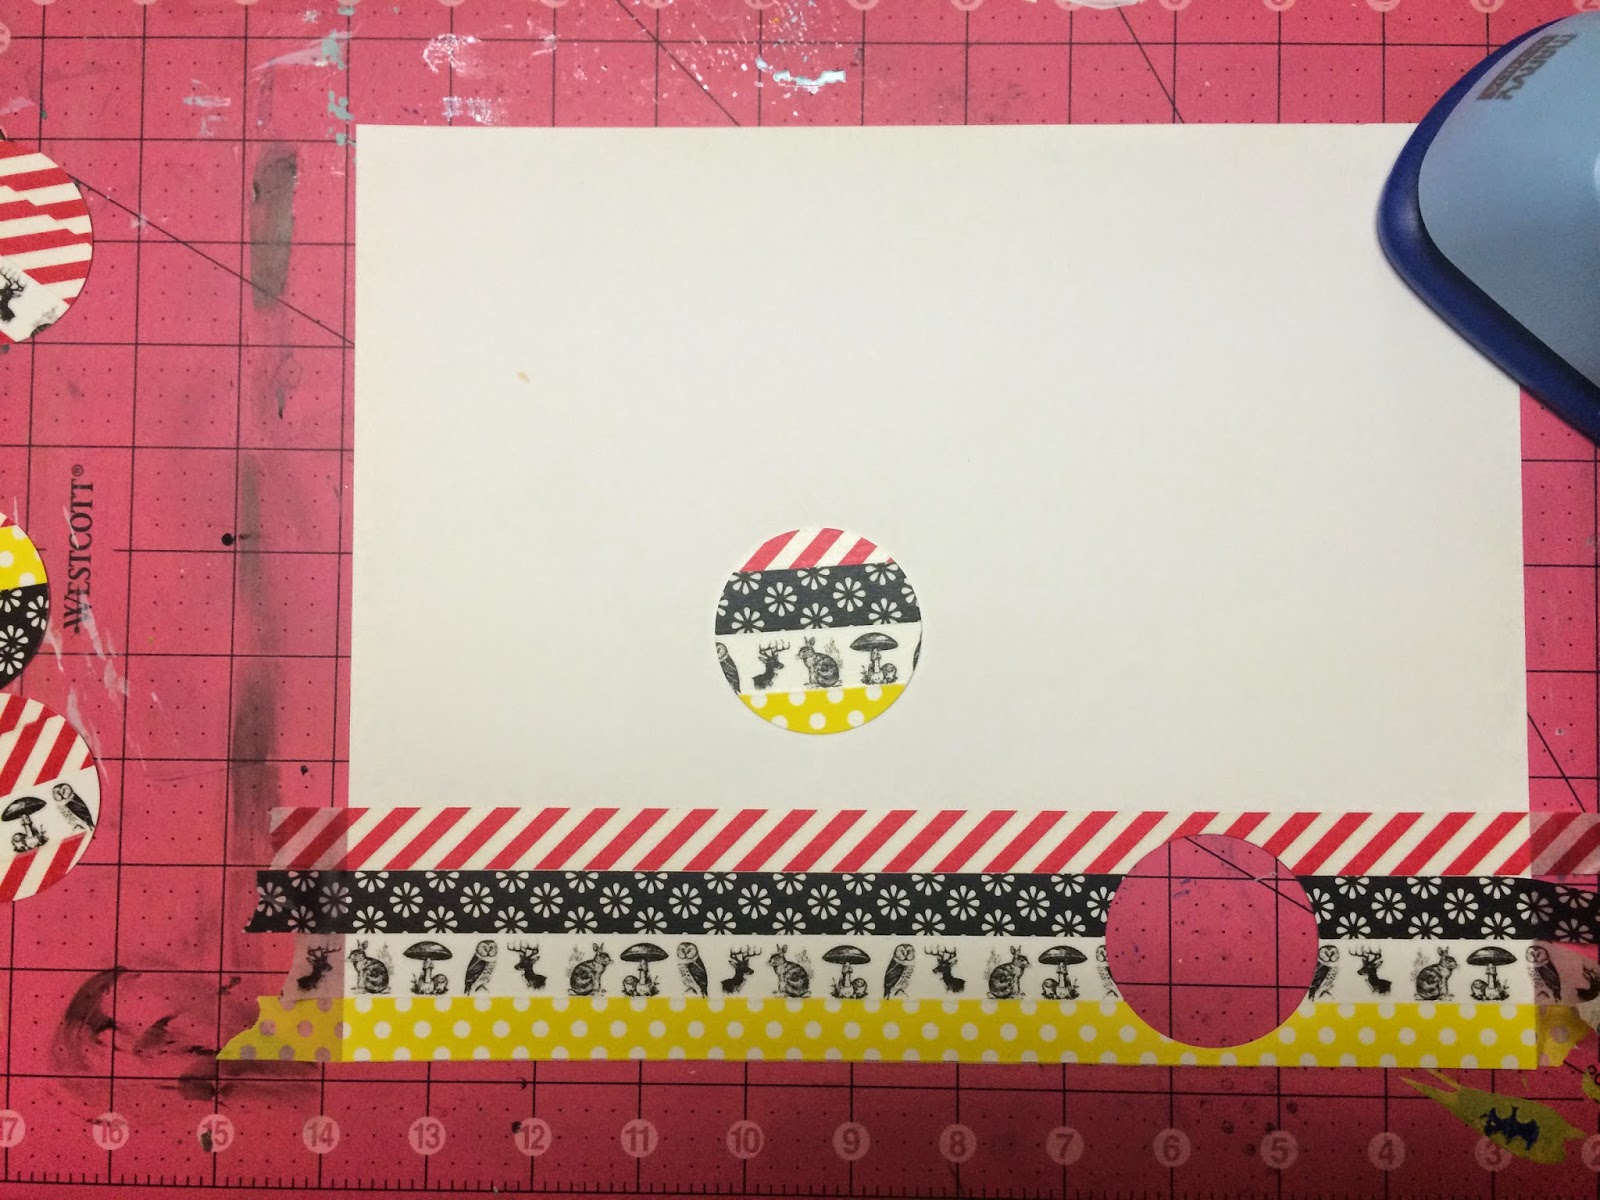
Happy Wednesday!  Rebecca here. I'm so happy to share my first project with you all.  Tapes are so versatile, and it's easy to create your own patterns and embellishments.  Let's start with these circles.


To create these circles, start with cardstock.  Lay several strips of washi tape down with no gap.


Then use a punch or electronic cutting machine to cut circles (or triangles or squares or any other imagineable shape).


Once you have a a good collection, start creating your layout!


I loved layering these circles under a piece of printed transparency.  And while these are brighter colors than I am typically drawn to - I felt like they were completely appropriate for an action movie layout - since an awful lot of super heroes wear black, red and yellow!

Have fun creating your next washi adventure!

Tuesday, May 20, 2014

An altered tin and punched flower tutorial

Hi Love My Tapes fans, it's Jaclyn here today.  I'm excited to be sharing my first design team project with you - an easy altered tin.  It's just perfect to house all the sweet little barrettes and hair ties I keep collecting for my little girl.  Based on the color scheme of supplies you choose, this project could easily be adapted to give as a gift to a teacher friend or neighbor.  Fill the finished tin with pencils, homemade cookies, store bought chocolates or even a small bouquet of pretty flowers.


Isn't it sweet?!  And the best part is, it's so very simple with the help of a stash of LMT's fabric and washi tapes.  The first step is to gather your supplies, as shown below.


As you can see, I grabbed an old cocoa tin and discarded the lid, for the base of my project.  LMT's pretty striped fabric tape was the perfect element to cover the outside of the tin.  Because of it's opaque nature, the fabric tape completely disguises the text and icons on the original piece. 

My next step was to create some fun embellishments to pretty up the container even further. Reaching for the aqua chevron washi tape was an obvious choice for me, as it would perfectly compliment the colors in my little girl's room.  Making the washi tape flowers was simple.  I first grabbed a scrap sheet of cardstock and layed three rows of tape down, being sure to match up the chevron pattern.  Since I knew that the underside of some of the flowers would show, I did the same thing to the back side of the paper, as well.


I used some of my favorite punches and dies, and punched a slew of flowers from the strips of washi paper, I had just created.


The final step is to layer the flowers and curl up the edges of each petal to provide more dimension. 


Once the flowers are adhered together you can finish them off with a button or enamel dot center.


A small bit of hot glue is the key to adhering your homemade washi tape flowers to the fabric covered tin.

 
Thanks for stopping by today!  I'd love to know if you give this ideas a try.  If you do post a picture to our facebook page and share with us and the Love My Tapes community!


Monday, May 19, 2014

Fabric Tape Rose Mini Book with Dana Tatar


Hi Love My Tapes fans! Dana here today sharing a fun-sized mini book. I used fabric tape and lace tape for this project. The pretty pink trim peeking from under the front cover of this book is lace tape. I'm thrilled to have this tape in my crafty arsenal! Adding this fantastic piece of trim to my book was quick and easy. The adhesive backing of this lace tape allowed me to dress up my project without the messy drying time of a liquid glue.


I crafted this rose with fabric tape! To start, I cut about 20 1-inch pieces of fabric tape. To create the rose petals, I folded the top corners of each piece of the tape down (See photo below). This left the center and bottom portions of the adhesive back uncovered. I then wound each petal around a paper piercing tool. The uncovered adhesive portions of the petals secured the bloom as I worked.


Notice the blue tape in the photo. This is the tape I used to create my rose. I wanted a bold pop of color for the cover of my book, so once my bloom was complete I sprayed it with mist. The fabric tape really grabs color in a fabulous way!

Thanks for stopping by today.
~Dana


Sunday, May 18, 2014

Smash Book Pages and a Fabric Tape Paperclip Flag Tutorial

Hello! I'm excited to be sharing my first Love My Tapes project with you! One of my favorite places to use tape is in my smash book. A smash book is like a scrapbook and art journal combined. Tape is a great way to add color and pattern, and to secure things to the pages. In this page spread, I used Love My Tapes washi tape to adhere the photo and a 4x3 card:


I love the polka dots! But the most fun I had with tape was making these tape flags:


The fabric tapes are the easiest tapes to use, but as you can see, washi tape works, too. If you'd like to make your own, follow these simple steps:


For more details about these smash book pages, visit my blog today and every Sunday for SMASH Sunday. I use tape on pretty much every page, and now you'll be seeing quite a bit of Love My Tapes tape there! Have a great day! Tessa